 Save to Pinterest
 My nephew pressed his nose against the planetarium glass, completely mesmerized by the glowing Pisces constellation overhead, and I realized right then that some magic deserves to be edible. That night, I went home determined to recreate that celestial wonder in cookie form, trading a telescope for a piping bag and gold leaf for stardust. The first batch looked a bit chaotic—my constellation lines wandered like I was making up constellations on the fly—but something about the imperfection felt right, like the universe itself had a sense of humor.
I brought a batch to a dinner party where my friend Sarah is obsessed with astrology, and she actually teared up a little bit—not because they were perfect, but because someone had listened to her ramble about her zodiac sign for months and actually made something special. Her partner tried to sneak three cookies before dessert was even served, which I took as a compliment.
Ingredients
- All-purpose flour (2 1/2 cups): This is your foundation, and sifting it really does make a difference in texture—I learned this the hard way after my first batch turned dense and sad.
- Unsalted butter (3/4 cup), softened: Cold butter will fight you during creaming, so leave it on the counter for at least an hour unless you enjoy frustration.
- Granulated sugar (1 cup): The sweetness that makes these cookies crave-worthy; don't substitute brown sugar unless you want a completely different (though delicious) outcome.
- Egg and vanilla extract: These bind everything together and add that classic sugar cookie flavor that makes people close their eyes when they bite in.
- Baking powder and salt: Tiny amounts that make enormous differences in spread and flavor balance.
- Powdered sugar (2 cups) and meringue powder: For the royal icing that hardens glossy and smooth, creating the perfect canvas for your constellation artwork.
- Gel food coloring: Liquid coloring will thin your icing; gel keeps it thick and pipeable, trust me on this one.
- Edible gold or silver pearls: These catch the light and make your cookies feel genuinely luxurious, or use nonpareils if you prefer subtlety.
Tired of Takeout? 🥡
Get 10 meals you can make faster than delivery arrives. Seriously.
One email. No spam. Unsubscribe anytime.
Instructions
- Whisk your dry ingredients together:
- Combine flour, baking powder, and salt in a bowl—this ensures even distribution and prevents streaks of baking powder in your baked cookies.
- Cream butter and sugar until fluffy:
- This takes about 2 to 3 minutes with an electric mixer and should look pale and cloud-like, incorporating tiny air pockets that make these cookies tender instead of dense.
- Beat in the egg and vanilla:
- Make sure everything is fully combined—you don't want random pockets of unmixed ingredients betraying your work later.
- Fold in the dry mixture gently:
- Mix just until you don't see flour streaks anymore; overmixing develops gluten and makes cookies tough, which is the opposite of what we want here.
- Chill the dough:
- Wrap it in plastic and refrigerate for at least an hour—this prevents spreading and gives you cleaner edges when you bake, plus it makes the dough way easier to roll.
- Preheat and prepare your baking area:
- Get the oven to 350°F and line your sheets with parchment paper to prevent sticking and ensure even browning.
- Roll and cut:
- Aim for 1/4-inch thickness and use circular cutters or whatever shape speaks to you; slightly thinner cookies bake faster and crispier.
- Bake with intention:
- Watch for golden edges around 8 to 10 minutes—the centers will feel slightly soft but firm up as they cool on the rack.
- Prepare your royal icing:
- Whisk powdered sugar and meringue powder with water until you reach stiff peaks, then add more water drop by drop if you need it thinner for spreading.
- Divide and tint your icing:
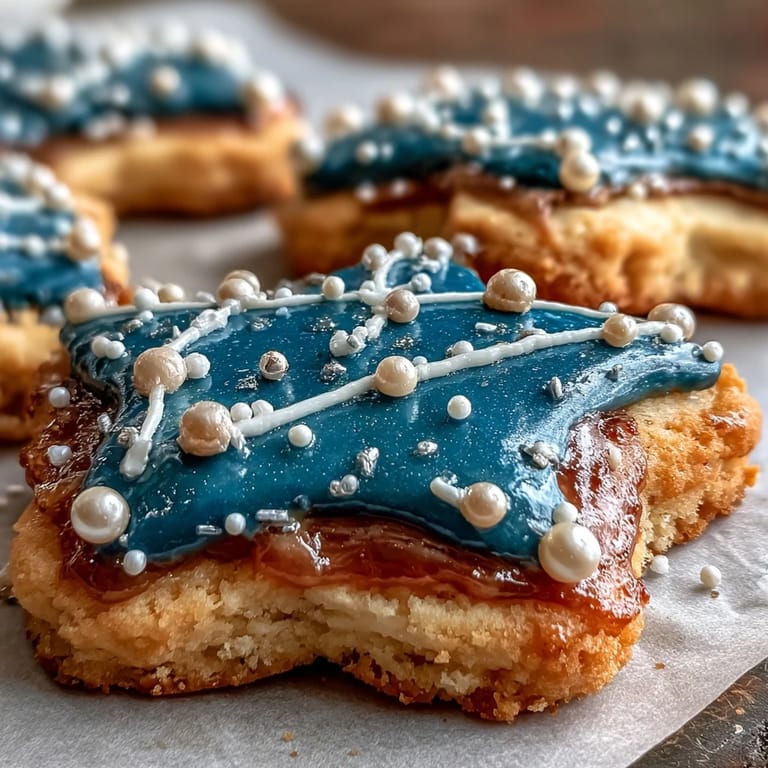
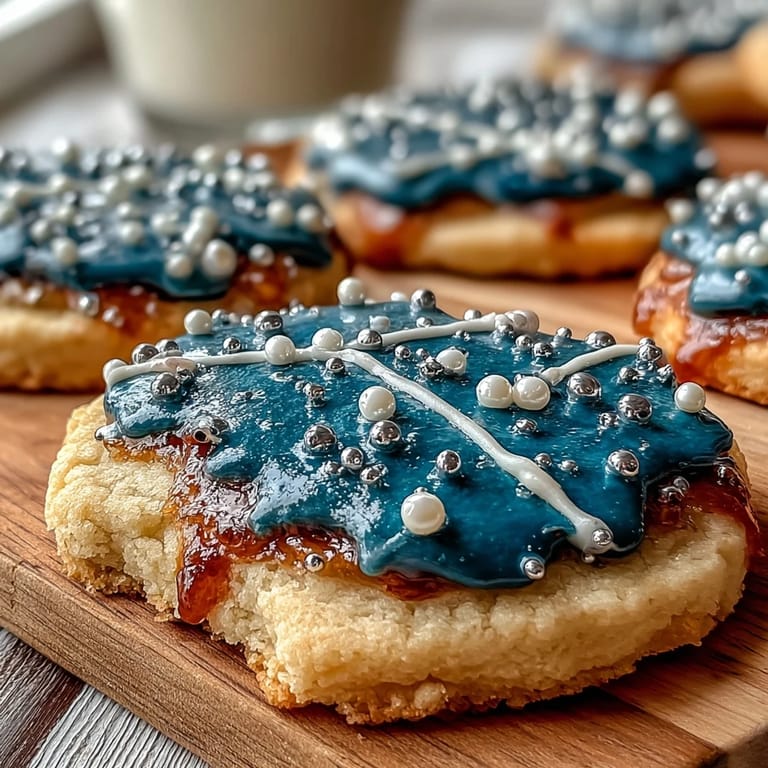
- Keep most white for piping the constellation, and mix the rest to a deep navy blue using gel coloring—this creates stunning contrast.
- Frost the cooled cookies:
- Spread blue icing across each cookie and let it set for about 15 minutes so your piped details won't smudge together.
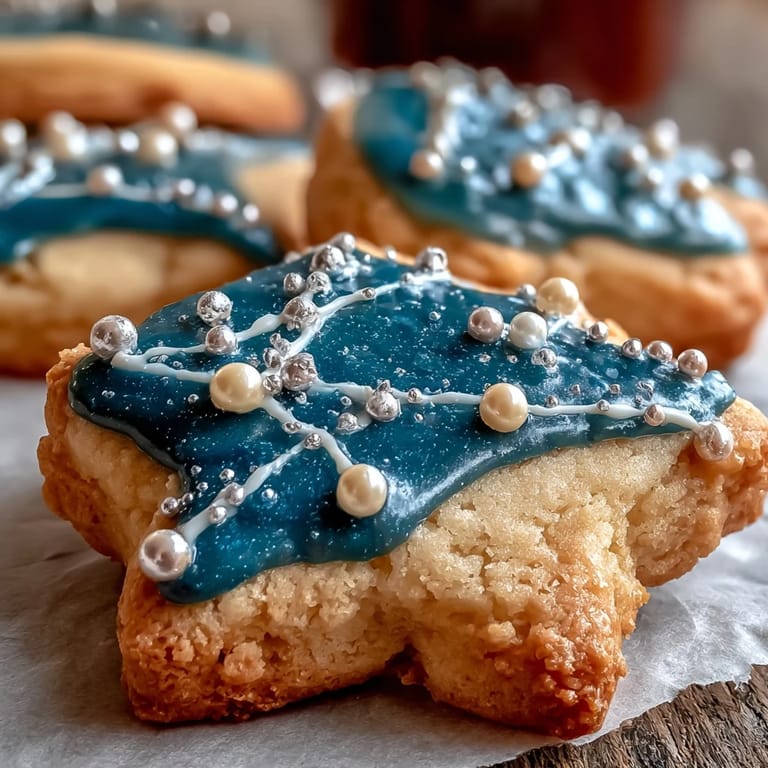
- Pipe your constellation:
- Using white icing in a fine-tipped bag, connect the stars of Pisces with delicate lines and dots—look up a reference image if you want accuracy or freewheel if you like mystery.
- Add your sparkle while wet:
- Press edible pearls at star points immediately after piping so they stick; add gold or silver accents wherever your eye desires.
- Let everything cure:
- Allow cookies to dry completely before stacking or storing—this usually takes a couple of hours and ensures the icing hardens to that perfect snap.
 Save to Pinterest
 There's something quietly magical about handing someone a cookie and watching them study the constellation before eating it, like they're holding a tiny piece of the night sky on a plate. That moment—that pause between admiration and indulgence—is when I know the whole process was worth it.
The Constellation Connection
I spent way too much time researching Pisces mythology while these baked, learning that the constellation represents two fish connected by a cord, which feels oddly fitting for a cookie that needs delicate precision. The actual constellation looks more chaotic than romantic once you understand it's just imaginary lines connecting random stars, but that's kind of beautiful in its own way. Now whenever someone eats one of these cookies, they're carrying a piece of ancient storytelling and astronomical wonder, which beats a regular sugar cookie any day.
Decorating Like You Mean It
The piping part is where patience becomes your best friend and also your worst enemy, depending on the day. I've had sessions where my hands felt steady and the lines flowed like I'd been doing this for years, and other times where I needed three tries and strong coffee before the constellation looked intentional rather than accidental. The beautiful part is that imperfect constellations somehow feel more honest, like you're recreating how ancient astronomers actually saw things—a bit wobbly, somewhat subjective, entirely human.
Perfect Pairings and Presentation
These cookies feel fancy enough to serve with chamomile tea or sparkling wine, and honestly, pairing food with intention makes eating it feel like a small ceremony instead of just snacking. I've started making these for people during their zodiac month, which sounds elaborate but really just means I get to bake more and people feel genuinely seen. Store them in an airtight container with parchment between layers, and they'll stay fresh and beautiful for nearly a week, though they rarely last that long in my house.
- You can absolutely swap the Pisces constellation for any other zodiac sign your friends or family claim.
- Make extra because people will ask for them again once they've seen how pretty they are.
- Edible glitter or luster dust applied after everything dries adds even more sparkle if you're in a particularly magical mood.
 Save to Pinterest
 These cookies remind me that baking isn't just about feeding people; it's about creating little moments where beauty and taste collide. Make them for someone who needs magic, or make them for yourself on a night when the stars feel particularly close.
Your Questions Answered
- → What makes these cookies delicate?
The combination of softened butter and proper mixing creates a tender crumb, enhanced by careful chilling and precise baking to maintain a soft texture.
- → How is the royal icing prepared?
Royal icing is made by whisking powdered sugar, meringue powder, and water until stiff peaks form. Adjust water for desired consistency and tint with food coloring.
- → How can I decorate the cookies with constellation details?
After frosting a navy blue base, use white icing to pipe constellation lines and dots, then place edible pearls to represent stars for an authentic look.
- → Can the cookies be made ahead of time?
Yes, baking in advance and decorating closer to serving helps maintain freshness. Fully dried icing ensures decorations remain intact during storage.
- → Are there alternatives for the edible pearls?
Yes, white nonpareils or gold dragees can be swapped in to suit preference or availability without losing aesthetic appeal.