 Save to Pinterest
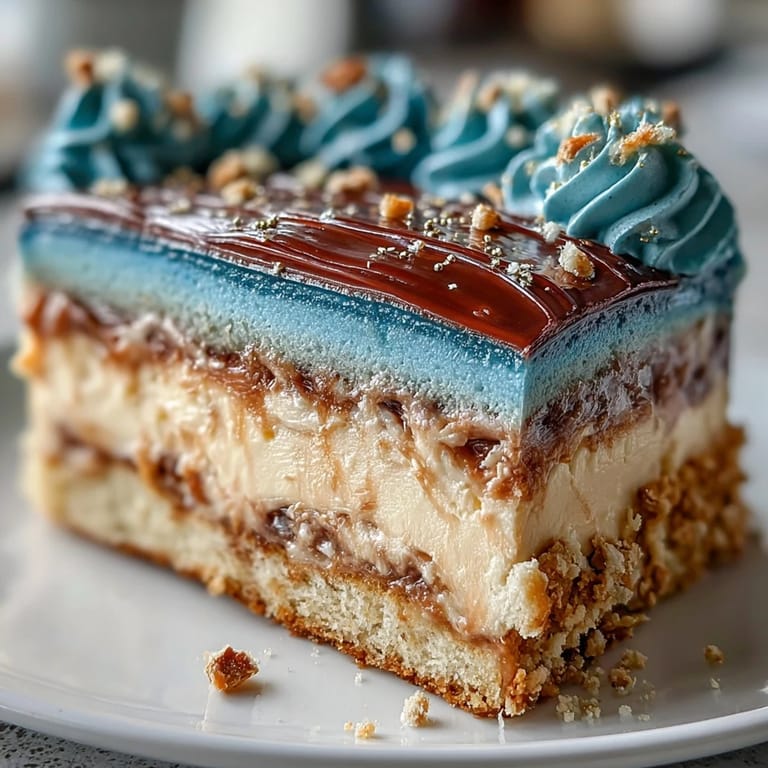
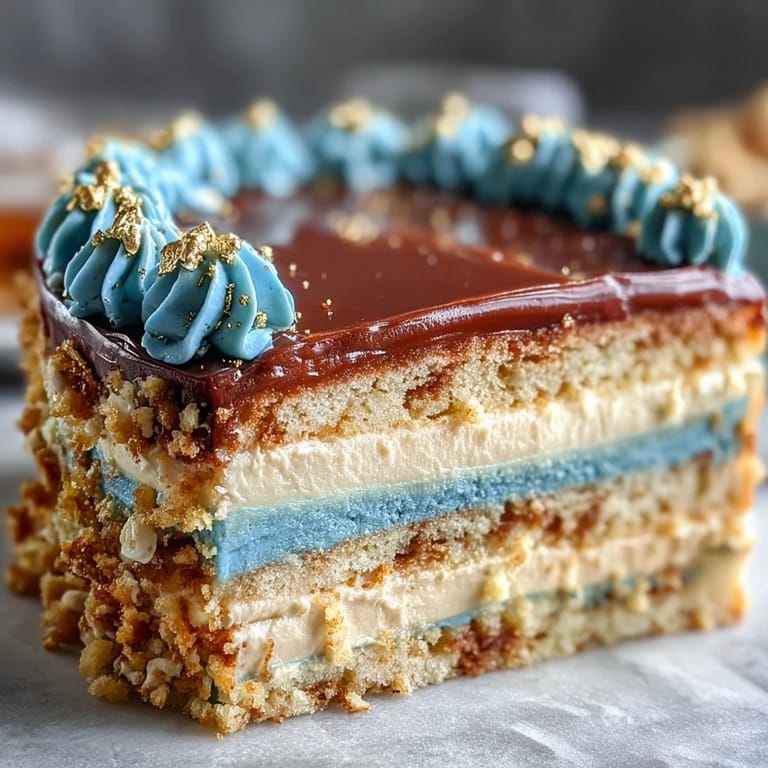
 When I first set out to make a graduation cake, I wasn't aiming for grandeur—just something that felt festive and bold for my nephew's big day. The kitchen was humming with excitement, and the scent of vanilla hung in the air as I whisked the batter. Watching the colors swirl from pale morning blue to deep indigo reminded me how every step of the journey is worth celebrating. I never expected gold leaf to transform a cake into such a showpiece, but it happened right before my eyes. There's something about playing with blue tones and edible gold that makes the process feel magical and slightly mischievous—perfect for marking a milestone.
Last time I made this cake, my cousin hovered nearby, sneaking tastes of buttercream and offering unsolicited advice about blue gradients. When the layers emerged from the oven, we stood in awe—the marbled effect came out perfectly, and everyone gathered around for the grand reveal. It was more than a cake—it was the centerpiece of graduation day, and the photos were dazzling. Decorating with edible gold leaf had us laughing about royal cakes and fancy awards, and it became an unforgettable family moment. Seeing graduates admire their names etched in gold atop a deep blue layer was the sweetest reward.
Ingredients
- All-purpose flour: Gives the cake structure and a tender crumb—always sift for smoothness.
- Baking powder and baking soda: Help the layers rise uniformly for those clean ombre slices.
- Salt: Balances sweetness and heightens the blue color in the layers.
- Unsalted butter: For a rich, moist cake and creamy buttercream—let it soften fully.
- Granulated sugar: Sweetens the cake and lends a slight shine to the crumb.
- Eggs: Bind everything together and give the cake lightness—room temperature makes mixing easier.
- Pure vanilla extract: Adds warmth and rounds out the sweetness, never skip this.
- Whole milk: Keeps layers plush—best at room temperature to prevent curdling.
- Blue gel food coloring: Use navy, royal, and light blue for a rich gradient; gels don't thin the batter and won't fade.
- Powdered sugar: Makes the buttercream fluffy—always sift to avoid lumps.
- Gold leaf or gold dust: The key to those sparkling accents—handle with care, they stick easily.
- Clear alcohol: Needed to mix gold dust for painting—vodka or lemon extract works best and evaporates quickly.
Tired of Takeout? 🥡
Get 10 meals you can make faster than delivery arrives. Seriously.
One email. No spam. Unsubscribe anytime.
Instructions
- Prep the pans:
- Grease and line three 8-inch round cake pans with parchment so the layers release effortlessly later.
- Mix dry ingredients:
- Whisk flour, baking powder, soda, and salt until no clumps remain; this keeps the cake light.
- Cream the butter and sugar:
- Beat the butter and sugar until pale and fluffy—listen for the creamy swoosh that signals it's ready.
- Add eggs and vanilla:
- Drop in eggs one at a time, mixing after each, then stir in vanilla for fragrance.
- Combine and color:
- Add dry mix and milk alternately, then divide batter into three bowls—swirl in blue food gel for ombre effect.
- Bake layers:
- Pour each color into its pan, smooth tops, and bake until set and springy; the kitchen fills with a sweet vanilla scent.
- Make buttercream:
- Beat butter till creamy, then add powdered sugar, vanilla, salt, and enough milk for a smooth, spreadable frosting.
- Tint and crumb coat:
- Reserve a cup of buttercream for the crumb coat; tint the rest dark blue, saving a bit for blending at the top.
- Assemble the cake:
- Level the cooled layers, then stack them from darkest to lightest, spreading buttercream between each one.
- Crumb coat and chill:
- Apply a thin buttercream layer to seal crumbs, then chill for 20 minutes—this keeps the surface smooth.
- Frost and blend ombre:
- Cover cake with dark blue frosting; gently blend lighter blue tones upward to achieve a soft ombre finish.
- Add gold accents:
- Use gold leaf or paint gold dust for a shimmering edge—each streak feels like a celebration.
- Chill and serve:
- Refrigerate until ready; slice and enjoy every milestone moment.
 Save to Pinterest
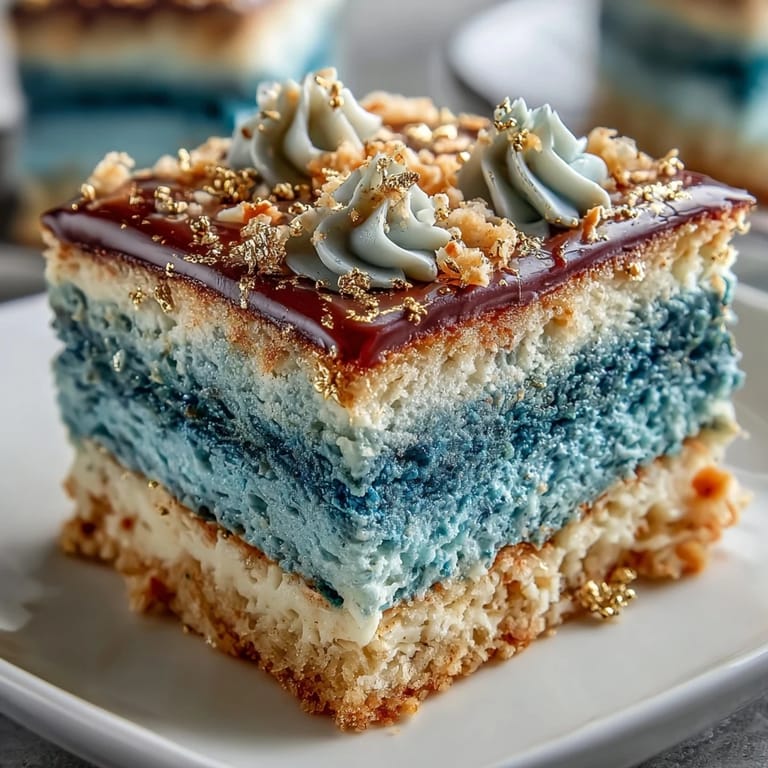
 One afternoon, as the cake chilled, my younger brother wandered in and confessed he wished he could skip to dessert. Sharing slices on graduation night felt more like a victory lap than a meal, and the gold shimmer drew kids and adults alike to the table. Someone snapped a picture as the first slice revealed perfectly blended blues—instantly, the cake became part of the story. It wasn't just dessert; it was the memory marker for all their efforts. Even the crumbs were celebrated, passed around as good luck tokens for the next adventure.
How to Achieve That Perfect Ombre
Coloring the batter feels like a mini science experiment in your own kitchen. Gel food colors provide dense, vibrant shades without watering down the mixture, and I found layering from darkest up makes the ombre effect pop when sliced. Don't stress over exact color matching—slightly different tones only add to the beauty and uniqueness. If you're feeling bold, swipe lighter buttercream along the top rim for a soft blended finish. The result is always a surprise, and even mistakes turn out striking.
Gold Accents Without Fuss
Applying gold leaf sounds intimidating, but it's more forgiving than it looks. Use a clean, dry brush to gently press the leaf onto the cake, or mix gold dust with a splash of vodka for a painted effect—it dries in moments. Don't worry if the streaks aren't perfect—the irregular flashes are what make it look truly celebratory. Avoid touching the gold with your fingers, as it easily sticks or tears, and embrace a little asymmetry for dramatic flair. The cake dazzles whether your brushstrokes are bold or delicate.
Make It Your Own for Graduations and Beyond
The ombre cake easily adapts to any celebration—try different color schemes or add themed toppers for a personalized touch. Frosting with a turntable simplifies smoothing, but I've made plenty of memorable cakes with only a steady hand and an offset spatula. If you want more layers, divide batter accordingly and remember to adjust baking time a tad. Let kids choose their favorite shades for a cake that feels genuinely theirs. Every time you make this cake, it becomes a slice of family history.
- Stash any leftover buttercream in the fridge for quick cupcakes later.
- Gold decorations are easiest to apply when the frosting is cold and firm.
- Check all gold leaf for allergens if guests have sensitivities.
 Save to Pinterest
 Celebration cakes always bring the kitchen to life, and this one truly glows with blue pride and gold sparkle. Share it with fellow graduates and watch every milestone shine a little brighter.
Your Questions Answered
- → How is the ombre effect achieved?
The ombre effect is created by dividing the batter and tinting each portion with varying shades of blue, then stacking the colored layers in order.
- → What makes the buttercream rich and creamy?
Buttercream is made with unsalted butter, powdered sugar, vanilla extract, and milk or cream, resulting in a smooth and luscious texture.
- → How are gold accents applied?
Gold leaf is gently pressed onto the frosted cake or gold dust is brushed on for elegant, shimmering details.
- → Can this dessert be customized for a different color scheme?
Yes, simply substitute desired gel food coloring to create unique ombre layers that match any celebration theme.
- → What tools are needed for assembly and decoration?
Key tools include round cake pans, an electric mixer, mixing bowls, an offset spatula, parchment paper, and a cake turntable.
- → Are there any allergens to consider?
This dessert contains wheat (gluten), eggs, and dairy. Check gold decoration ingredients for additional allergens.