 Save to Pinterest
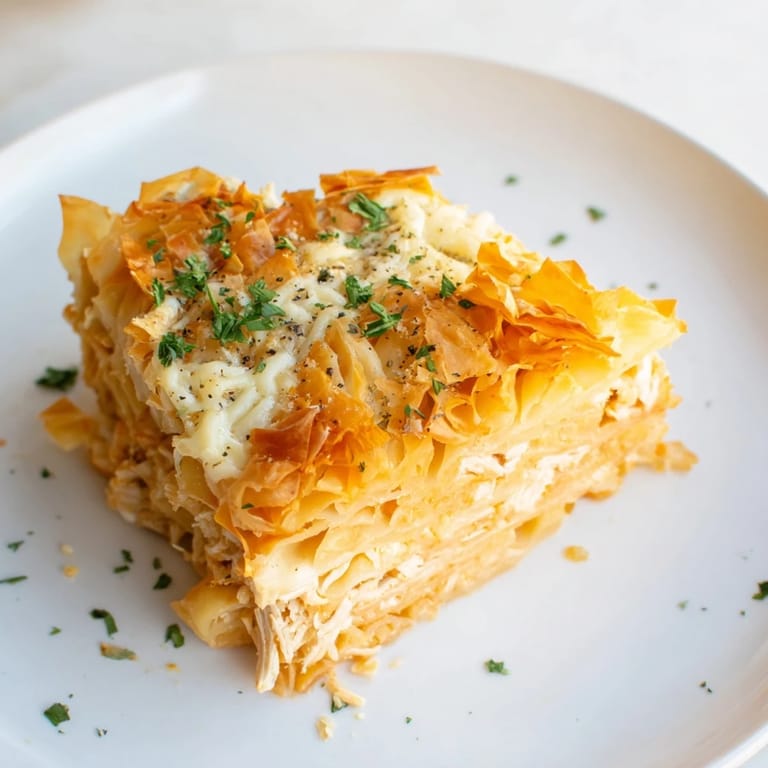
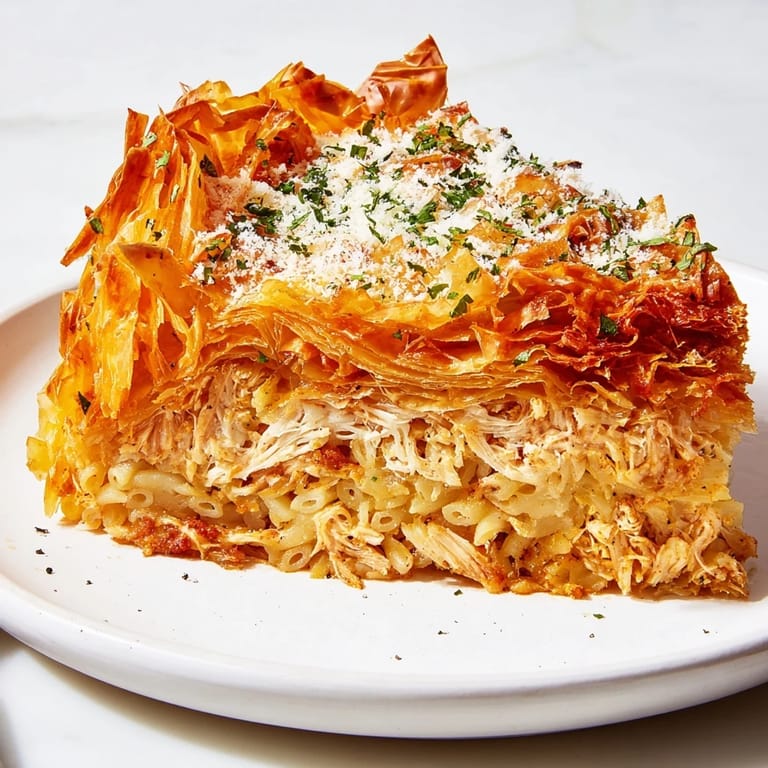
 I stumbled onto this recipe while scrolling through videos at midnight, half-convinced I was looking at dessert until the chicken revealed itself. There's something magnetic about taking a viral phyllo crinkle technique and tilting it savory, filling all those crinkled layers with creamy chicken and pasta instead of the expected sweet custard. The first time I made it, my kitchen filled with the smell of buttered phyllo crisping in the oven, and I couldn't believe how elegant something so forgiving could look.
I made this for a potluck where everyone brought something forgettable, and someone actually asked me to bring it again the next week. That moment, watching people go back for thirds while asking what was in it, made me realize this wasn't just a clever fusion—it was genuinely delicious and different enough to matter.
Ingredients
- Cooked chicken breast, shredded (2 cups): Use rotisserie if you're short on time; it's honestly better because someone else already did the work and it has more flavor from the skin.
- Ditalini pasta (1 cup cooked): These tiny tubes catch the custard beautifully, but small pasta shapes work if that's what you have.
- Ricotta cheese (1 cup): This is your creamy base, keeping everything tender instead of rubbery.
- Shredded mozzarella (1 cup): The stretchy one, the one that browns and gets those little crispy edges you crave.
- Grated Parmesan (½ cup): Don't skip this; it's where the sharp, salty depth comes from.
- Fresh parsley (2 tablespoons chopped): A small gesture toward freshness, cutting through all that richness.
- Garlic powder (1 teaspoon): Easier than fresh here, and it distributes evenly through the filling.
- Dried oregano (½ teaspoon): Just enough to say Italian without shouting it.
- Salt and black pepper: Taste as you mix; cheese is salty, so go gentle at first.
- Phyllo dough (16 sheets, thawed): This is the star; work quickly and keep it covered with a damp towel or it turns into papery shards.
- Unsalted butter, melted (½ cup): This is where the crinkles get their golden crispness and flavor.
- Large eggs (3): Part of the custard that soaks through and sets everything together.
- Whole milk (1 cup) and heavy cream (½ cup): Together they create a custard that's rich but not heavy, tender but not watery.
Tired of Takeout? 🥡
Get 10 meals you can make faster than delivery arrives. Seriously.
One email. No spam. Unsubscribe anytime.
Instructions
- Set the stage:
- Preheat your oven to 375°F and grease a 9x13-inch baking dish generously. You want no sticking disasters here.
- Build the filling:
- In a large bowl, combine your chicken, cooked pasta, ricotta, mozzarella, Parmesan, parsley, garlic powder, and oregano, then season with salt and pepper. Mix until it's cohesive but still textured, not overworked into paste.
- Prepare the phyllo:
- Unroll your thawed phyllo and immediately drape a barely damp towel over it. Phyllo dries out in seconds, and dried phyllo becomes your enemy, shattering instead of crisping.
- Scrunch and butter the bottom layer:
- Take one sheet of phyllo, lay it on a clean surface, brush it lightly with melted butter, then gently accordion it into loose, natural-looking crinkles. Think more rumpled than folded.
- Build the base:
- Place your first scrunched sheet into the baking dish and repeat with 7 more sheets, arranging them side by side to cover the bottom. They don't need to be perfect; irregular coverage is actually more interesting visually.
- Add the filling:
- Spoon your chicken and pasta mixture evenly over the phyllo base, leaving about a quarter-inch from the edges so the custard can seep through without overflowing.
- Create the top layer:
- Repeat the scrunching and buttering with the remaining 8 phyllo sheets, layering them on top to completely cover the filling. Brush everything with the last of your melted butter.
- Make the custard:
- Whisk together your eggs, milk, cream, salt, and pepper in a separate bowl until smooth and fully combined. Pour this evenly over the assembled cake, letting it soak down through the phyllo layers.
- Bake until golden:
- Bake for 35 to 40 minutes until the top is deep golden brown and the phyllo sounds crisp when you tap it. The edges will smell incredible first; that's your signal you're close.
- Rest and serve:
- Let it cool for 10 minutes before slicing, which allows the custard to set enough to hold together on the plate. Slice with a sharp knife and serve warm, optionally garnished with extra parsley.
 Save to Pinterest
 There was a moment while it was baking, maybe 20 minutes in, when my partner walked into the kitchen and said it smelled like something fancy, something you'd pay for. That moment of recognition, that shift from homemade curiosity to something that felt genuinely refined, made me understand why this recipe has staying power.
Variations and Add-Ins
The beauty of this dish is how forgiving it is to improvisation. I've stirred sautéed mushrooms and fresh spinach into the filling on evenings when I had vegetables sitting around, and the added moisture and earthiness made it feel like a completely different meal. The custard soaks everything into harmony, so there's room to play.
Wine Pairing and Serving
A crisp Sauvignon Blanc cuts through the richness beautifully, its acidity lifting all that cheese and butter. But honestly, I've served it alongside sparkling water and crusty bread, and that simplicity lets the crinkles and the creamy filling do all the talking.
Make-Ahead Tips and Storage
You can assemble this entirely the night before, cover it tightly with plastic wrap, and bake it the next day; add maybe 5 extra minutes to the baking time since you're starting cold. Leftovers keep for three days refrigerated and actually reheat beautifully in a low oven, though I've found myself standing in front of the fridge eating cold pieces straight from the dish more often than I'd like to admit.
- Assemble fully the night before, refrigerate, and bake the next day for stress-free entertaining.
- Reheat leftovers in a 300°F oven for 10 minutes to restore crispness without drying out the inside.
- Freeze unbaked assembled cake for up to a month; add 10 minutes to bake time straight from frozen.
 Save to Pinterest
 This recipe taught me that the best dishes are the ones that look more complicated than they are, that make people feel like you've done something special when really you just trusted the process. Make this for the people you want to impress without trying too hard.
Your Questions Answered
- → What type of pasta works best in this dish?
Ditalini pasta is ideal due to its small size, which mixes well with the shredded chicken and cheese filling without overpowering the layers.
- → How should the phyllo dough be handled to avoid tearing?
Keep the phyllo covered with a damp towel while working to prevent drying, and brush each sheet lightly with melted butter before scrunching gently.
- → Can I prepare this dish ahead of time?
Yes, assemble the layers and refrigerate before baking. Bring to room temperature before baking for even cooking.
- → What variations can be added for extra flavor?
Sautéed mushrooms, spinach, or a pinch of crushed red pepper add depth and a subtle kick to the filling.
- → How do I store leftovers to maintain texture?
Store leftovers in an airtight container in the refrigerator and reheat in the oven to preserve the phyllo’s crispiness.
- → Is there a suitable wine pairing for this dish?
A crisp white wine like Sauvignon Blanc pairs well, complementing the creamy cheese and savory chicken flavors.